Bake Heavenly Soft & Buttery Rolls in 1 Hour: Beginner-Friendly
Imagine the aroma of freshly baked bread wafting through your kitchen, a golden pan of rolls, so incredibly soft and drenched in butter, ready in just 60 minutes. Sounds like a dream, right? For many, homemade bread feels like an intimidating, all-day affair, especially when yeast is involved. But what if we told you that baking truly heavenly,
buttery dinner rolls is not only achievable but can be done from start to finish in a mere hour, even if you’re a complete beginner? Prepare to unlock the secret to incredibly easy, melt-in-your-mouth rolls that will steal the show at any meal.
This isn't just another dinner roll recipe; it's a game-changer. For years, this method has been the go-to for countless home bakers, consistently delivering perfectly soft, fluffy, and undeniably buttery rolls. What makes it so revolutionary? A minimal ingredient list, incredibly efficient rise times, and the flexibility to make the dough by hand or with a stand mixer. Whether it's a busy weeknight when you’re craving homemade comfort or a holiday feast where every minute counts, these 1-hour
soft dinner rolls are your secret weapon for success.
The Magic Behind 1-Hour Buttery Dinner Rolls: Understanding Rich Dough
The secret to those coveted melt-in-your-mouth rolls lies in what bakers call a 'rich dough.' Unlike lean doughs, which produce crusty, chewy breads like ciabatta or artisan loaves, a rich dough incorporates a higher percentage of fats (like butter), eggs, and often sugar. These ingredients do more than just add flavor; they tenderize the gluten structure, resulting in an exceptionally soft, fluffy texture and that signature flaky, buttery taste we all adore.
This recipe for
homemade dinner rolls leverages the power of a rich dough combined with strategic techniques to minimize rise times. While some traditional bread recipes call for hours of proofing, this method optimizes yeast activity and dough development, allowing you to go from flour to finished rolls in about an hour. It’s a testament to smart baking, proving that incredible homemade bread doesn't always demand an entire afternoon. This understanding is key to feeling confident and empowered in your bread-making journey.
Gather Your 7 Simple Ingredients & Essential Tools for Success
One of the most appealing aspects of this quick and easy recipe is its simplicity. You only need a handful of pantry staples to create these show-stopping
buttery dinner rolls. The magic happens with just seven core ingredients, each playing a vital role in achieving that perfect texture and flavor:
*
Active Dry or Instant Yeast: The leavening agent that makes your rolls rise.
*
Warm Milk: Activates the yeast and adds richness.
*
Granulated Sugar: Feeds the yeast and contributes to flavor and browning.
*
Melted Unsalted Butter: The star ingredient, providing richness, tenderness, and that unmistakable buttery flavor.
*
An Egg: Adds richness, helps with structure, and contributes to a golden crust.
*
All-Purpose Flour: The primary structural component of the dough.
*
Salt: Enhances flavor and controls yeast activity.
Beyond these ingredients, you'll need some basic kitchen tools. A large mixing bowl is essential, and you have the choice of using a sturdy wooden spoon or your hands for mixing, or the convenience of a stand mixer fitted with either a paddle attachment or dough hook. While the mixer speeds up the process and reduces arm fatigue, don't let its absence deter you; making the dough by hand is entirely feasible and wonderfully tactile. A rolling pin, a sharp knife or bench scraper, and a baking dish (like a 9x13 inch pan) will complete your setup.
While this recipe is incredibly forgiving, mastering the fundamentals of baking with yeast can transform your confidence. For an even deeper dive into each of the essential ingredients and their roles, along with troubleshooting common yeast questions, explore our comprehensive guide:
Master Soft & Buttery Dinner Rolls with 7 Simple Ingredients.
Mastering the Dough: Mixer, Hand-Kneading, and Beyond
The dough for these
easy dinner rolls comes together surprisingly quickly. Whether you opt for a stand mixer or prefer the hands-on approach, the process is straightforward.
Using a Stand Mixer:
If you have a stand mixer, this step is practically effortless. Combine the warm milk, sugar, and yeast in the mixing bowl and let it sit for a few minutes until frothy, indicating the yeast is active. Then, add the melted butter, egg, salt, and gradually incorporate the flour. Start with the paddle attachment to bring the dough together, then switch to the dough hook. Knead on medium speed for about 5-7 minutes. You’re looking for a smooth, elastic dough that pulls away cleanly from the sides of the bowl.
Kneading by Hand:
Don't have a mixer? No problem! Mix the wet ingredients and yeast in a large bowl, then gradually add the dry ingredients. Once a shaggy dough forms, turn it out onto a lightly floured surface. Knead with vigor for 8-10 minutes. This is where you build strength and elasticity in the dough. You’ll know your dough is properly kneaded when it’s smooth, resilient, and passes the "windowpane test" – meaning you can stretch a small piece thin enough to see light through it without tearing. This manual process can be quite therapeutic and offers a wonderful sense of connection to your baking.
Once your dough is kneaded, it's time for the first, remarkably quick rise. In this recipe, we often bypass a long bulk fermentation, instead moving directly to shaping or a very brief rest before shaping, thanks to the rich dough properties and optimized yeast activity. For a truly speedy result, some bakers place the dough in a slightly warm, draft-free spot (like an oven with just the light on) to encourage faster rising.
Quick Rise, Quick Bake: Bringing it All Together
After kneading, gently divide your dough into equal portions. For standard dinner rolls, aim for 12-16 pieces, depending on your desired size. Roll each piece into a smooth, tight ball. This helps create that perfectly rounded, professional-looking roll. Arrange your shaped rolls snugly in a greased baking dish. The closeness encourages them to rise upwards and maintain their soft sides.
Now for the second, equally quick rise. Cover the pan loosely with plastic wrap or a clean kitchen towel and let them rest in a warm place for about 15-20 minutes. This short proofing period is just enough to give the rolls their final lift and achieve that signature airy texture before baking. While they're rising, preheat your oven to the recommended temperature.
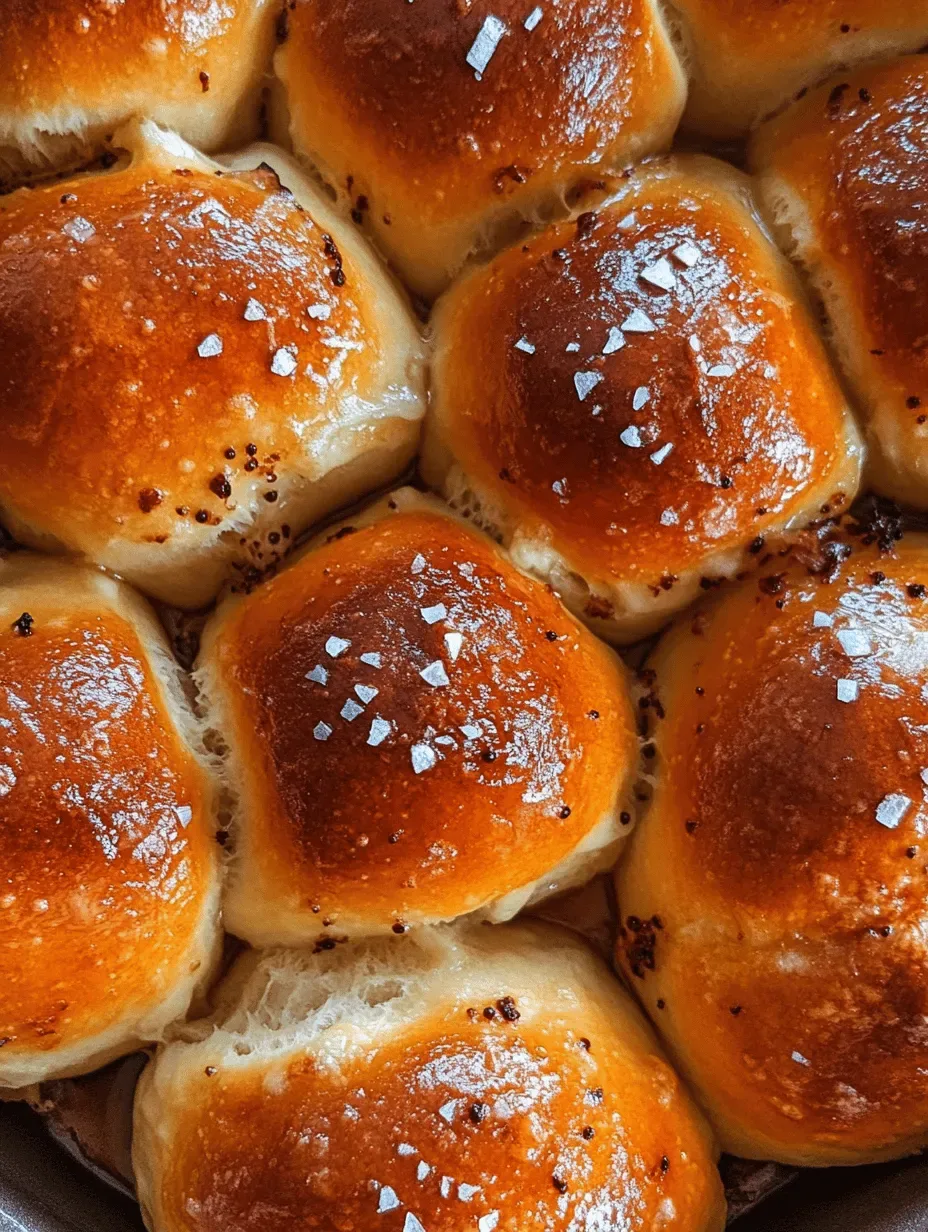
Once risen, brush the tops of the rolls with a little melted butter for an even richer flavor and a beautiful golden-brown crust. Bake for approximately 15-20 minutes, or until they are deeply golden on top and cooked through. Keep a close eye on them, as oven temperatures can vary. The moment they emerge from the oven, fragrant and glistening, is pure joy. For an extra touch of indulgence, brush them generously with more melted butter while they're still hot – it soaks right in, enhancing their flavor and keeping them incredibly moist.
Elevate Your Buttery Dinner Rolls: Variations & Make-Ahead Tips
While these classic
buttery dinner rolls are perfect on their own, they also serve as a fantastic canvas for creative variations. Elevating them is simple and incredibly rewarding:
*
Garlic & Herb: Before baking, mix some minced garlic, fresh parsley, and a pinch of dried oregano into your melted butter for brushing. The aroma alone is heavenly!
*
Cheesy Delight: Incorporate about ½ cup of shredded cheddar, Parmesan, or a blend of cheeses directly into the dough during the last few minutes of kneading, or sprinkle on top before baking.
*
Sweet Rolls: Reduce the salt slightly and add a touch more sugar to the dough. Fill with cinnamon-sugar and roll into swirls for a delightful breakfast or dessert.
*
Everything Bagel Seasoning: For a savory crunch, brush with egg wash and sprinkle with everything bagel seasoning before baking.
And the best part? These aren't just one-and-done rolls. If you're planning ahead or simply love the idea of fresh-baked bread on demand, this recipe offers excellent make-ahead options. You can prepare the dough in advance, store it in the refrigerator, and bring it out when you’re ready to bake. This flexibility makes them ideal for busy schedules and ensures you can always have warm, homemade rolls on hand. Learn all about preparing the dough in advance and discover even more creative variations in our dedicated resource:
Rich Dough Secret: Make-Ahead Soft & Buttery Dinner Rolls Guide.
Conclusion
Baking heavenly
soft and buttery rolls in just an hour is not a culinary myth; it's a delicious reality waiting to unfold in your kitchen. This beginner-friendly recipe demystifies yeast baking, proving that with a few simple ingredients and clever techniques, you can achieve homemade bread that rivals any bakery. From their incredibly soft texture to their rich, buttery flavor, these rolls are a guaranteed crowd-pleaser and a perfect addition to any meal. Don't let intimidation hold you back any longer; bookmark this recipe, gather your ingredients, and prepare to impress yourself and everyone around your table with the magic of 1-hour
homemade dinner rolls. Happy baking!